
Quilting Tip: Achieving an Even Stitch Length
Imagine: you sit down at your home sewing machine with your freshly basted quilt. Your quilt seamlessly flows through your machine, without any pulling, friction, or hang ups. You look at your work and see perfectly even stitches. Wouldn't that be a dream?
Achieving a more even stitch length is something that I continue to try find ways to improve when quilting. Whether you are a beginner quilter, or more advanced, there are always ways to improve your craft. I know how hard and frustrating it is to see those uneven stitch lengths pop up on a quilt top, so I put together some tips that I have found to be the most helpful for moving closer to perfectly spaced stitches.

+ Slow down. This has made the biggest difference for me. While I would love to zoom through quilting lines, when I sew too fast it just results in a bunch of little stitches followed by a bunch of stretched out stitches. Not the result I’m going for!

+ Reduce the presser foot pressure. If your machine has this option, this can help all of those layers of fabric slide through more easily.

+ Increase stitch length. I piece my quilt tops using a 2.0 mm stitch length. I do not recommend trying to quilt with nearly that short of a stitch. A stitch length somewhere between 3.0 mm and 3.5 mm depending on the thickness of my fabric seems to do the trick (e.g., if I am using a flannel backing, I will increase the stitch length to 3.5 mm vice 3.0 mm or 3.25 mm).

+ Do not pull the quilt through the machine - allow the machine to do the feeding while you guide. I struggle with this balance and it is something on which I constantly work. Along with slowing down, it has helped to take pauses throughout a line to make sure the quilt is not hung up on anything (e.g., your table, lap, chair, or your machine’s extension table).

+ Wear quilting gloves. These help you grip the fabric and reduce your pulling (added bonus - allows you to pretend to be a mime or Mickey Mouse).

+ Make sure the weight of your quilt is supported. This can be difficult to do if you are sewing on a small surface. If you have a small designated sewing space, consider moving your machine to a larger surface for quilting. A dining room table will give you more room to support the weight of your quilt and will reduce the drag that is caused by that weight pulling around your needle. For large quilts, you can also place a chair next to you as a sort of lap extension to support the weight. I sew on an adjustable height table and have found that lowering the table closer to my lap (thereby reducing the height distance from my lap to my machine's table) has helped as well. Experiment with this - there was a time when I sat on my couch and sewed at my coffee table!

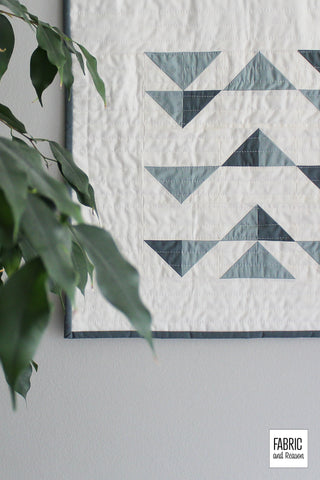
+ Try quilting with wavy lines. Wavy lines are a great way to add organic elements to your quilt without having to take a dive into free motion quilting or sending your quilt top off to a long arm quilter. I decided to quilt my Desert Hills Quilt with wavy lines to add some organic elements to an otherwise very linear quilt pattern. My uneven stitches blended into the wavy lines and are hardly noticeable.
+ Remember that handmade items will never be *perfect* (and they will still be used and loved just the same).
Do you have any more tips to share? Leave them in the comments!